
How to Build a Searchable Brand Asset Library with AI
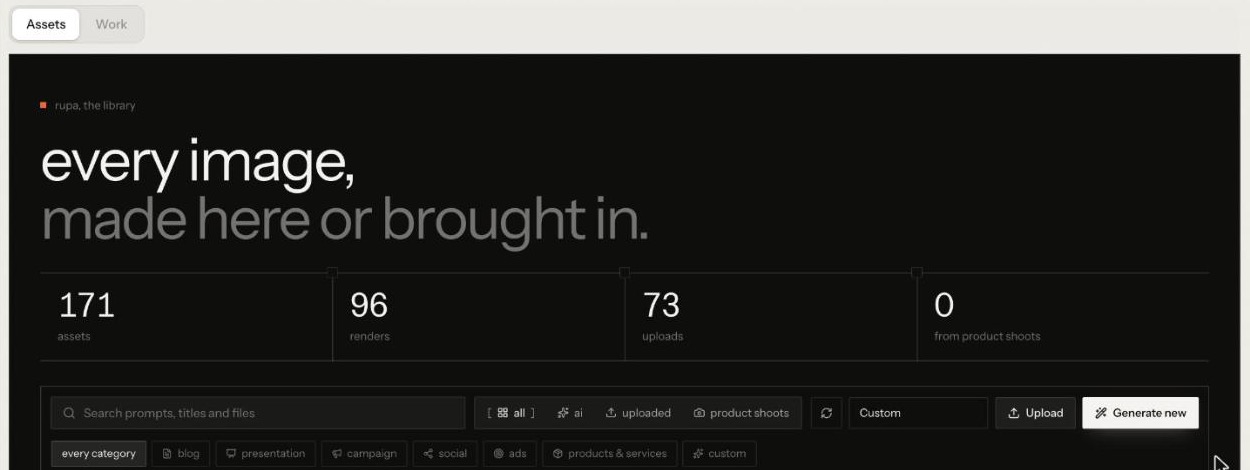
To build a brand asset library that people and AI agents can both use, keep every approved image in one place, store your logos, colours and voice in a single brand book, attach real product photos to the products themselves, and make every image findable by what it shows, not by its file name. Then make reuse the easy path: references, saved presets and shoots that file themselves. This guide shows how in RUPA, Nagent's image producer.
What makes a brand asset library useful?
Most brand libraries fail in the same ways. Logos live in five folders and nobody knows which is current. Product shots are named IMG_4471. New images are made from scratch because finding the old ones takes longer. And once AI tools enter the picture, every tool needs the brand pasted in again.
A useful library answers three questions fast:
Is this the current, approved version? One source for logos and brand rules.
Can I find it by describing it? Search that reads what is in the picture.
Can I reuse it without starting over? Images that travel into the next brief as a reference or an input.
In Nagent, that library is the Library tab on RUPA's page, whose heading says it all: "every image, made here or brought in." The Knowledge Hub's Assets tab reads the same images. RUPA files every image she makes there, and it holds what your team uploads too. Because it lives in the workspace rather than in one person's drive, every agent that works with images reads from the same shelf. RUPA is in Beta, so expect a few rough corners.
Step 1: What should go in the library?
Before you upload anything, decide what belongs. A brand asset library in Nagent is built from six kinds of asset, each with a home:
Asset: Logos, colours, voice and brand rules, Where it lives: The Knowledge Hub's Brand tab
Asset: Product photos, Where it lives: Each product under Products and services
Asset: Approved campaign images, photos and screenshots, Where it lives: Uploaded to RUPA's Library
Asset: Images RUPA renders, Where it lives: Filed in the Library automatically
Asset: Looks you want to borrow, Where it lives: References, picked from the same library
Asset: A look your team repeats, Where it lives: A preset of your own
Keep drafts and rejected work out. A library people trust is one where everything in it is usable.
Step 2: How do you keep logos and brand rules in one place?
Your brand lives in one book, on the Knowledge Hub's Brand tab under Teach, at nagent.ai/admin/brand. Its heading is "in one book every agent reads", and the line under it says what that means: "Every image, copy block and asset your agents make reads from this row." RUPA's Settings tab links here as Brand kit.
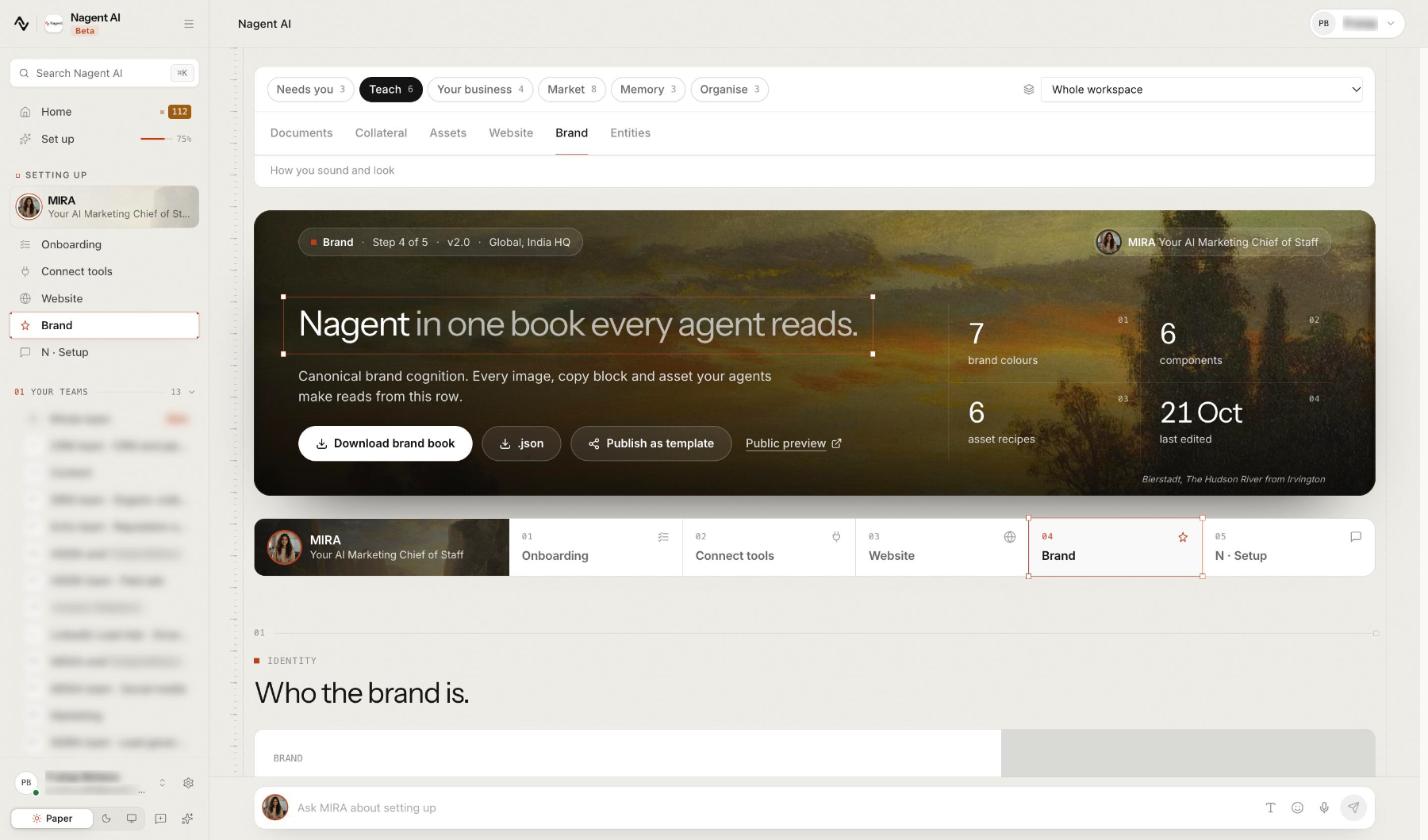
Brand is also one of the set-up steps, so you can fill it in the set-up chat with N and your AI Chief of staff, or work down the page yourself:
Fill the Logos section. It holds six versions of your mark, each used where it fits: Light mode (the primary, so upload it first), Dark mode, Horizontal, Vertical, Square (1:1) and Favicon. Each takes an upload or a pasted link, and the section counts how many are set.
Upload your published guideline under Guideline document. It outranks anything read off your website.
Confirm the brand voice. Extract from website writes a draft beside the voice in use, and nothing changes until you press Confirm.
Read the book itself. Under the page, the book's tabs run Overview, Visual DNA, Components, Cognition, Communication, Recipes, Forbidden and JSON.
Download a copy with Download brand book or .json, so the rules can travel outside the workspace.
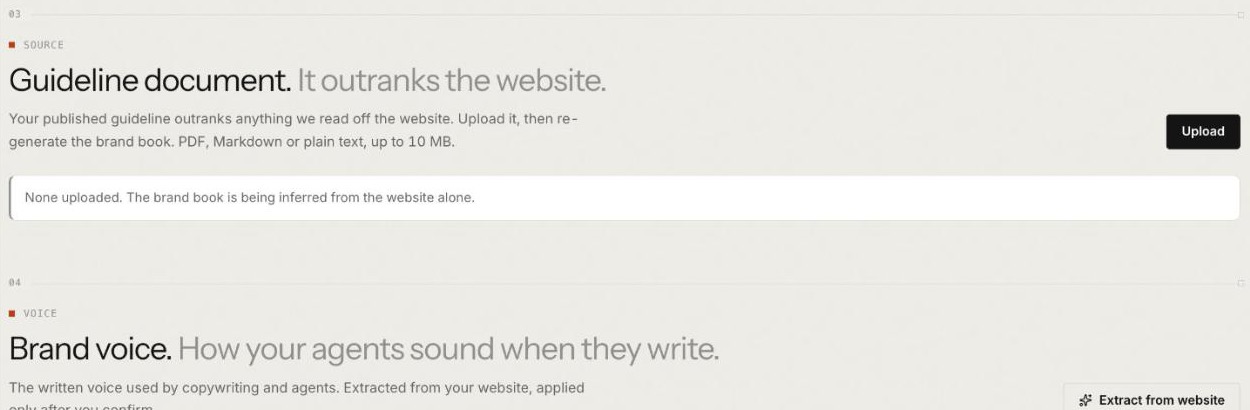
If the guideline section reads "None uploaded. The brand book is being inferred from the website alone.", fix that first: upload the guideline, then regenerate the book. Now there is one current logo, not five. RUPA sends this book with every brand-locked render, and your logo travels as a real image to be placed rather than redrawn. Detail is in the Brand Lock guide.
Step 3: How do you turn your logo into reference sheets?
The Brand book section on the same tab draws four plates from your logo: an Identity poster, Logo variations, a Construction grid and an Animation storyboard. The first run takes about a minute and about 40 credits, and Re-generate draws them again after you change the logo.
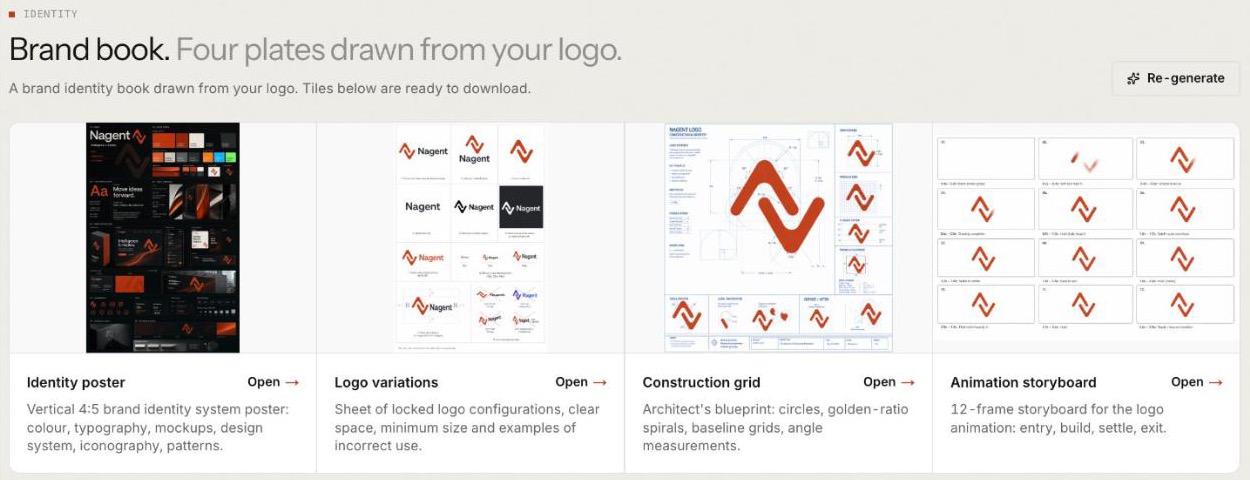
Each plate has Open, and the tiles are ready to download. File them where your team will look: the logo variations sheet, for one, shows locked configurations, clear space, minimum size and examples of incorrect use in one image.
Step 4: How do you attach product photos to the products?
Product photos are the assets teams reuse most, and the ones most often lost. In Nagent they belong on the product itself. Add images to each active offering under Products and services; see products and services.
Once a product has images, the Settings sheet in RUPA's studio holds a Product field. Pick a product and its images go with the render as references, with the instruction to keep the product exactly as shown. A product with no images is listed with "No images yet; add one to the offering to use it here."
In a team room the same holds: ask RUPA for a picture of one of your products and she looks it up among your active offerings and sends its images. A product with no images is refused in words, rather than drawn from a guess.
Step 5: How do you upload the images you already have?
Open RUPA's page at nagent.ai/admin/rupa and pick Library, then Assets. The Work view beside it lists the work RUPA filed.
Pick a category in the menu beside Upload, so the file lands in the right place.
Press Upload and choose the file.
Repeat for your approved campaign images, photography and product screenshots.
The counts at the top show how many assets you hold, and how many are renders, uploads and images from product shoots. Generate new opens the studio when an image doesn't exist yet.
Step 6: How does AI make every image searchable?
Here is where an AI library differs from a folder. Every image that arrives in your workspace is described by the model shortly after it lands: an upload, a Knowledge Hub image, a logo in the brand kit, a RUPA render or a preset reference. The description, with tags and any words read off the image, is kept with the image and indexed.
That index is what the studio's picker reads. Its search box is labelled Search what is in the images, so "red mug on a wooden table" finds the image even if its file is called IMG_4471, and hovering a thumbnail shows its description. Agents read the same descriptions when they look through your assets. The Library tab's own search box is simpler: it finds prompts, titles and file names.
Describing an image is a model call, so it costs a little. It's charged to your workspace's credits and to RUPA's budget for anything that lands in the library, and both are checked before the call. If either is used up, the image is kept all the same; it just isn't described until there is room again.
Step 7: How do you keep the library organised, and who can change it?
Search does the heavy lifting, but a little structure helps people browse:
Filter by source: all, ai, uploaded or product shoots.
Filter by category: blog, presentation, campaign, social, ads, products and services, and custom.
Rename, retag, refile: hover an asset to download it, copy its link, edit its title, tags and category, or delete it.
Set one house rule for names, such as product, campaign and month, and apply it when you retag. Then decide who curates. Admins see the whole workspace's library; other people see only what they made or uploaded. Only the person who added an asset can edit or delete it, and editing the brand book needs content write permission. Give the people who curate the library admin access, and everyone else can still add and reuse their own work.
Step 8: How do you reuse an asset in a new image?
A library earns its keep when old work makes new work faster. In RUPA's Studio tab, press the paperclip in the brief dock to open Pick from the library. Its tabs are All, References, Knowledge Hub, Renders and Uploads, so one sheet holds everything. Choose how to use the image before you pick it:
As an input image, when it must appear: a product shot or a logo. A render takes up to ten input images.
As a reference, when you want its look: Match the style, Reproduce the layout, Change the headline, Localise it or Remix it.
So last quarter's best ad can become this quarter's starting point: pick it, choose Change the headline, and brief the new line.
Step 9: How do you save a repeatable look as a preset?
When your team keeps borrowing the same look, save it once. Open Presets on the studio's tool rail and choose New preset. Give it a name, a base preset (whose size it keeps), the instructions every brief made with it should follow, a line on When to use it, up to eight references from the library and its default settings. Press Save. A confirm card appears, which you can approve yourself; nothing is saved before that.
Your presets show first in the list, tagged Beta, for everyone in the workspace. The person who made one, or an admin, can change or retire it. A preset is a library asset in its own right: the look, written down.
Step 10: How do you fill the library with a product shoot?
When a launch needs fresh product imagery, plan it as a shoot so the results file themselves. Pick the product in Settings first, then choose Shot list under Skills on the rail, or type /shotlist and what the shoot is for, such as "/shotlist autumn launch for the leather tote".
RUPA answers with a shot list of up to eight shots, each a packshot, lifestyle, flat lay, scene or mood image, with the scene, the camera angle and the props. Planning renders nothing. Each shot has its own Render, which goes through RUPA's level and budget like any render, with Brand Lock on.
Every shot is filed in the library tagged as a product shoot, with the shoot's own id. The product shoots filter shows them, and Whole shoot gathers the rest of one shoot. One caution: the shot list itself isn't saved, so once you leave the studio the plan is gone, though its plates stay in the library.
Where does RUPA sit in the team?
Nagent organises its AI teammates like a growth team: an AI Chief of staff heads each department, team leads own a kind of work, and some leads run a bench of sub-agents. The full chart is on the team page. RUPA works on the Content line:
CREA, AI Content Chief of Staff
RUPA, team lead, image studio (no sub-agents)
FOLIO, team lead, long-form
Alpha, team lead, video studio, with a bench of desks such as ADS, UGC and AVATAR
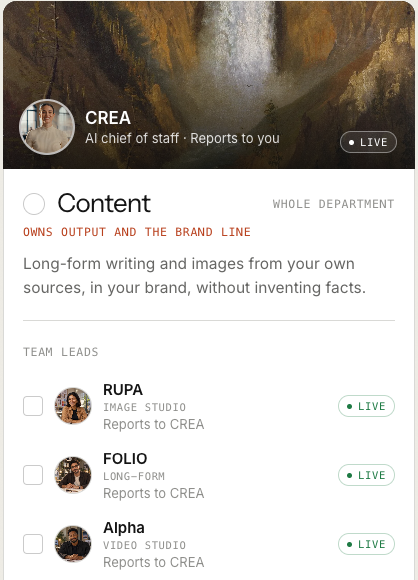
How a request moves. You ask the Content room in one line. CREA decides who owns it and hands image work to RUPA. RUPA makes it, files it in the library, and brings the result back to the thread, with anything that needs a person waiting on a card. You approve, edit or decline in the room.
Why the library matters across the line. The library is shared, so work flows between teammates without re-uploading. Alpha's product shots in video start from an image of the real product chosen from the RUPA library. When Marketing needs visuals, MIRA passes the writing and visuals to CREA's Content team, and a handoff to another department is always a written handoff to that room's lead.
What are the limits today?
Descriptions arrive shortly after an image lands, not instantly, so a brand-new upload may take a moment to show in the picker's search.
The Library tab's search reads prompts, titles and file names, not descriptions. Search by what an image shows from the studio's picker.
An image refused for budget isn't described until there's budget again.
A shot list isn't saved after you leave the studio.
For everything the studio does, read the RUPA studio guide and the Knowledge Hub guide.
Frequently Asked Questions
How do I organize brand assets so my team can find them?
Keep logos, colours and voice in one brand book, product photos on the products, and every approved image in one shared library with a source and a category. Make search read what each image shows, so people can find assets by describing them.
Can AI search images by what is in them?
Yes. In Nagent, every image that lands in the workspace is described by the model and indexed, and RUPA's studio picker searches those descriptions. An image the budget couldn't describe yet is kept, but won't appear in that search until it's described.
Where do AI-generated brand images go in Nagent?
Every saved RUPA render lands in her Library, which the Knowledge Hub's Assets tab also reads. Uploads land there too, and both can be reused in new briefs as references or input images.
Who can delete assets from the library?
Only the person who added an asset can edit or delete it. Admins see the whole workspace's library; everyone else sees what they made or uploaded.
Build the library once, reuse it every week
A brand asset library pays off when the current logo is never in doubt, every image can be found by describing it, and the best work becomes the start of the next brief. RUPA keeps that library in the workspace, where your people and your agents read from the same shelf.
Book a demo to see RUPA set up a library from your own brand.