
CREA and the content studio
How CREA's team writes blog posts, decks, documents and landing pages grounded in your Knowledge Hub and brand, how you review and publish them, and how to ask for them from any room.
Browse documentation
CREA writes for your company, from your own material
CREA leads your content team. Give the team a topic and it researches, drafts, edits, reviews, illustrates and links a blog post, then stops and waits for you. Nothing goes live until a person approves it.
The content team is CREA plus the makers CREA hands work to: RUPA for images, PAIGE for decks and documents, LANDON for landing pages, NOVA for newsletters and Alpha for video, plus a small group that turns documents into publications. Every workspace has the content module, so the screens below are open to you from the start. PAIGE and LANDON have their own page: Decks and landing pages. NOVA is described below, under Write a newsletter with NOVA.
One more team lead sits under CREA on the Org chart. VIDYA runs your learning series: season plans, episode scripts and lessons, every claim about your company taken from the Knowledge Hub, and one finished long-form video per episode. Its room, VIDYA team, works inside the Content room and today reaches only the workspaces Nagent sets it up for. See VIDYA for its seats and what it makes.
Find them in the sidebar under Content studio. The two you will use most are Blog Studio, under Pages & Posts, and the Studio (Plan to Publish) board under Strategy & Planning.
How a draft is grounded
A draft is only useful if it is about your company. CREA's team builds every draft from what your workspace knows:
| What | Where it comes from |
|---|---|
| Your company name | Your brand profile, or the workspace name |
| Your products and services | Products and services in the Knowledge Hub |
| Facts and detail | Up to six passages from your Knowledge Hub that match the topic |
| Voice | Your brand book |
| Call to action | Your demo or booking link, if you have set one |
If your Knowledge Hub has nothing on a topic, the draft is written without it rather than inventing detail. If you have no brand book yet, the draft uses a plain, neutral voice: "Write professionally and concisely. Active voice. Specific outcomes." Internal links are never made up.
Our logic: a general-purpose writer will fill gaps with confident generalities. Grounding the draft in your own documents, products and voice is what makes it yours, and the more you put in the Knowledge Hub and the brand book, the better every draft gets.
So before your first post:
- Add your key documents to the Knowledge Hub.
- Add what you sell under Products and services.
- Fill in your brand book at nagent.ai/admin/brand, especially the Communication tab, which sets voice.
- Set your default blog author, below. Drafting waits until you do.
Set your default blog author
Every post the team drafts for your workspace carries one byline: your default blog author. Nagent's own name never stands in for it.
Open Settings and find the Default blog author card: "The byline, bio and photo on every post drafted for this workspace. Drafting waits until one is set."
- Type the Name readers should see: a person or a team.
- Optionally add an Email (optional), a Photo URL (optional, https) and a Bio (optional) of one or two lines.
- Click Save author.
The name cannot be Nagent's, the email cannot be a Nagent address, and the photo must be an https address that is not a Nagent image. The card lists anything that needs fixing before it saves. Changing the author needs the settings write permission, which a workspace admin holds.
The same card sits on the Identity step of onboarding (nagent.ai/admin/onboarding/identity), where Save & continue saves it with the rest of the step.
Until an author is set, the card says "No author is set, so new drafts are held." A draft from Generate AI draft on the Posts page, or one written automatically, stops before it spends anything, with: "This workspace has no default blog author. Set one in Settings, Content, then draft again." A Blog Studio run stops with the same message at its last step, before publishing, and shows Errored.
The author goes on every new draft, whoever approves it: the person who clicks Approve & Publish is not put on the byline. A post you write yourself with New Post starts with an empty author; leave it empty and it carries the default author. A Byline in the house format (below) replaces the default author on every draft the team writes.
Article style (Beta)
Article style, on Settings beside Blog engine mode, is the shape CREA writes every post in. The team's reviewer and the check before publishing hold posts to the same shape, so a post is never written one way and checked another. Tone, spelling and words to avoid stay on your Brand page.
Choose one of three:
| Choice | What a post looks like |
|---|---|
| Search-ready blog | An FAQ section, question headings and a 40 to 90 word answer up top. Titles of 25 to 80 characters. Best for search and AI answers. The default. |
| News article | The news first, from the primary source, in a 20 to 60 word opening. Plain headings, no FAQ, no call to action. Titles of 25 to 110 characters, so a full news headline fits. |
| Custom | You choose each part: FAQ section, Question headings, Closing next step, the Opening paragraph, in words (10 to 150), and the Longest title, in characters (60 to 120). |
Click Save. The card says where the style comes from: Your choice, Following your newsroom framing (a workspace whose Source Watch Framing is Newsroom writes news articles until it chooses), or Default. Clear my choice goes back to the framing's style. Changing the style needs permission to write content.
House format (Beta)
Below the three choices, House format holds your newsroom's own rules, on top of the shape. Leave a box empty to skip it; an empty box asks nothing of the writer.
| Box | What CREA does |
|---|---|
| Byline | Credits every draft to this name, such as your news desk, and never credits a news agency or another outlet as the author. Up to 80 characters. |
| Article length, in words | Writes the body within this range, 100 to 3,000 words, aiming at its middle. The length check before publishing uses the same middle. |
| Headline length, in words | Writes headlines within this range, 4 to 20 words. Keep it inside the style's title length in characters. |
| Show social posts in articles | When a story rests on a public post by an official, an organisation or a public figure, puts the post's link on a line of its own straight after the paragraph that reports it, up to Most social posts in one article (0 to 5). Never anonymous or private accounts. |
| Our editors add related links | Adds no "Also read" or related links, and no related posts list. CREA never makes up a link either way. |
| Other house rules | Anything else your editors want, in your own words, up to 1,500 characters. CREA follows it as written. |
Social posts work with X (Twitter), Instagram and YouTube links. When articles go to your WordPress site, X and YouTube links arrive as embedded posts and videos. Instagram links arrive as plain links, because WordPress has not embedded Instagram posts since version 5.5.2.
Write a post in Blog Studio
Open Blog Studio. It reads: "Type a topic. Nine AI teammates do the rest: research, draft, edit, review, illustrate, link, audit. You only step in at the end to approve."
- Leave the mode on Topic / brief.
- Type the Topic. For Prompt World: "How sales enablement teams can use prompt libraries to shorten ramp time".
- Optionally open Add an angle or brief and say who it is for and what it must argue.
- Click Start the agent team.
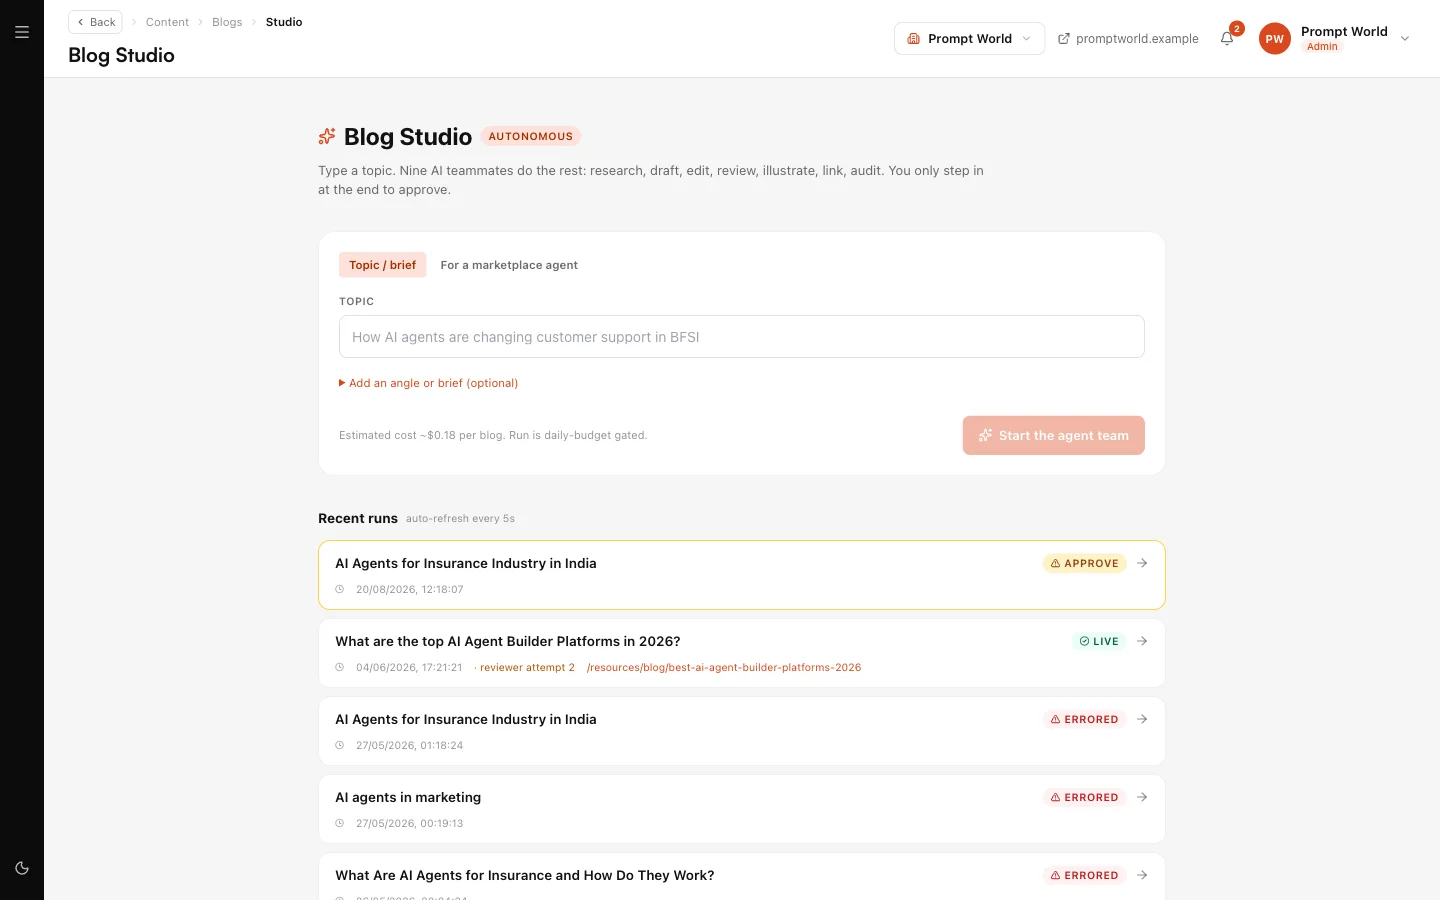
The run appears under Recent runs, which refreshes every few seconds. A row reads Live while the team works, Approve when it is waiting for you, and Errored if it failed.
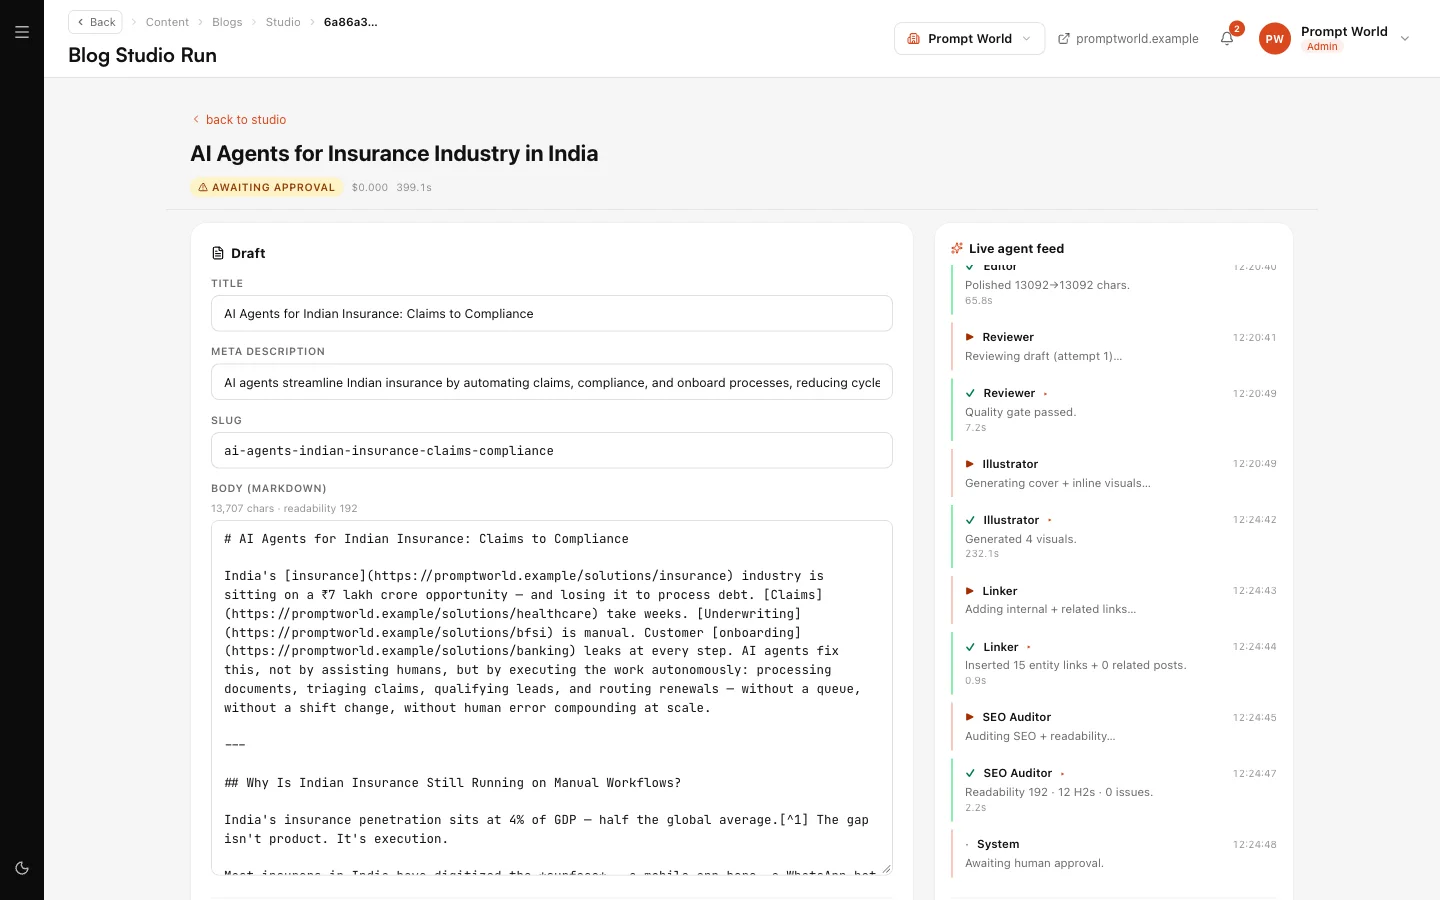
Open a run to watch it. The run page shows a Live agent feed, the Draft so far, the Citations gathered and the Visuals generated.
Ignore the For a marketplace agent mode. It writes about Nagent's own AI teammates and is not meant for your content.
Review and publish
When a run reaches Approve, the run page opens the draft for editing: the Title, Meta description, Slug and Body. If the team's reviewer flagged something, its feedback is shown above the draft.
You then have two choices:
- Send back with feedback returns the draft to the team with your note, and it runs again.
- Approve & Publish publishes the post.
Every post, yours included, goes through a check in code before it can publish. It fixes on its own what it can without changing your meaning: en and em dashes, a first heading that repeats the title, placeholder images, footnote markers with no public source, a Sources list of internal files, and a "What's next" or "Next steps" heading, which it renames "What should you do next?". What only a writer can fix holds the post, with one sentence per problem and the heading it sits under, for example "This post cannot be published until these are fixed: The FAQ has 2 questions; it needs 3 to 5." Under the Search-ready blog style the check asks for the list below; a news or custom style asks for its own shape instead (see Article style):
- A lead paragraph of 40 to 90 words above the first section.
- At least 60% of section headings written as questions.
- A "Frequently Asked Questions" section with 3 to 5 questions as ### headings.
- Your brand's voice: the post writes in the person your voice sets, and without contractions if your voice uses none.
- On a team draft, a length within 15% of its target.
- No mention of Nagent in the body or byline, and links a reader can open.
A post with no body is refused too: "This post has no body to publish." No permission overrides this check.
The team's reviewer also reads every post before it publishes. On a draft the team wrote, its rejection holds the post. On a post you wrote yourself with New Post, it only advises: the editor shows "The reviewer advises against publishing this post" with its reason and suggestions. Fix the post, or type Your reason for publishing anyway and click Accept and publish. Your reason is recorded with the post.
A post is also refused at publish if it carries Nagent's identity instead of yours: Nagent as the author, a Nagent email or photo, a Nagent hero or inline image, or a link to Nagent. It names what it found, for example "This post carries the platform's identity (author, link). Replace it with this workspace's own before publishing." Edit those out and publish again. No permission overrides this check.
After publishing, you can keep editing on the same page and click Save changes. Changes to a published post take effect immediately, so treat that as editing a live page.
To approve and publish, or to publish over the reviewer's advice on your own post, you need the publish permission for content, which a workspace admin holds. Overriding a reviewer's rejection of a team draft needs a separate override permission that is not part of the workspace admin role.
Our logic: a blog post carries your name. The team can do every step up to the last one, but the last one is yours.
How your website shows your posts
Your posts are stored in your workspace. Your own website reads them with a site key: issue it in Settings, Integrations on the Site connection card, which is marked Beta, and give it to your developers. The same key serves approved visibility fixes. The full set-up is in Connect your site.
The run page shows a Live at path and a View live link after publishing. Those point at the Nagent website, not yours. Check the post on your own site once your developers have connected it.
Make a deck or document with PAIGE
PAIGE is CREA's presentation maker. PAIGE has its own page, PAIGE, also reached from Team on CREA's page.
- Open PAIGE's Studio. Under Other ways to start, open A full brief. From an org template starts from your house structure, and Blank from an empty deck or document.
- Pick Presentation or PDF document.
- Pick a Purpose: Sales pitch, Proposal, Company profile, Product overview, Investor update, Board report, Internal update, Training / enablement, Product guide, Case study, One-pager, Report, Event brief or Custom. A Product guide is a step-by-step walkthrough: one action per step, each with a slot for a screenshot you annotate in RUPA, and nothing the screens do not show.
- Write the Brief: what it should achieve, the key messages, the facts to include and the ask. Add an Audience, for example "CFO of a mid-size retailer", and the number of slides or pages if you want to set it.
- Optionally narrow what PAIGE reads: Department knowledge, a Presenter or author, and up to ten Knowledge docs to ground on.
- Click Draft with PAIGE.
PAIGE uses your brand guidelines for fonts and colours. Without them it uses a neutral theme and says so. Every slide or page is editable after it drafts: move, duplicate or delete sections, then Save. Download the result as a PDF, as an editable PowerPoint file, or open Print and use your browser's Save as PDF for selectable text.
To reuse a structure, open any document and use Save as org template. Templates appear under Org templates, and Start from template, no AI copies one without drafting.
Every step, with editing and templates, is on Decks and landing pages.
Case studies
Pick Case study as the purpose, or ask CREA for one in her room. PAIGE writes it in a fixed order: the customer and their context, the challenge, what was done, the measurable results, then a quote.
PAIGE names the customer, a result or a quote only when your knowledge or documents contain it. Anything missing becomes a placeholder for you to fill: "[Customer name]", "[X%]" or "[Customer quote, with their permission]". A quote is used only word for word, with its attribution.
A case study usually names a real customer, so it carries a warning:
- The editor shows it at the top every time you open the case study, with how many placeholders are left and how many quotes to check.
- Marking it ready, downloading the PDF or PowerPoint, and opening Print each ask first whether the customer has signed off. OK goes ahead and Cancel goes back.
- The list marks each case study Needs customer sign-off.
Nothing records the sign-off and nothing stops you: getting it is yours to do.
Our logic: a customer's name in your case study is a promise you made to them. We remind you at the moments it could leave the building, and leave the call to you.
Build a landing page with LANDON
LANDON is CREA's landing page builder. LANDON has its own page, LANDON, also reached from Team on CREA's page.
- Open LANDON's Studio.
- Pick a Goal: Lead capture, Demo request, Event registration, Product launch, Waitlist, Content download, Webinar or Custom.
- Write the Brief: the offer, who it is for, the key messages, the proof you have and what visitors should do. Add an Audience and, if you like, a Title, which also sets the address.
- Optionally pick Department knowledge, a Person / voice and knowledge docs to ground on, then click Build with LANDON.
Click any section in the preview to edit it, and check it in the Desktop and Mobile views. When it is ready, click Publish. The page goes live at a public address on Nagent, shown with a Copy link button, and its form sends leads straight into your CRM. Later edits go live with Publish changes; Take offline removes the page. The list shows each page's Views, Leads and conversion.
Publishing needs the content write permission. Your agents can draft pages but do not publish them: a person clicks Publish.
Editing, packages for your own site and custom domains are on Decks and landing pages.
Write a newsletter with NOVA
NOVA is CREA's newsletter writer (Beta). NOVA has its own page, NOVA, also reached from Team on CREA's page.
- Open NOVA's Studio. It tells you how many confirmed subscribers you have.
- Write the Brief: the lead story, the short items and the one thing you want readers to do. Add a Title if you like.
- Click Write with NOVA. NOVA writes a subject line, preview text, a lead story, up to three short items and one call to action, from your knowledge base and in your brand voice. Where a fact is missing it writes a placeholder such as [Date] or [X%] instead of inventing one.
The issue opens with the fields on the left and a preview of the email on the right. Edit any field and click Save to refresh the preview. Every issue ends with an unsubscribe link, filled in for each reader when it is sent.
When it is ready, click Send to 120 subscribers. You are asked to confirm, with the count, because an issue cannot be unsent. It goes to everyone who subscribed and confirmed and has not unsubscribed, within your workspace's sending limits; the page then shows how many it reached and how many the limits skipped. An issue is sent once: after that it is read only, and the list marks it Sent. If subscriber sending is switched off for your workspace, nothing goes out and the issue stays a draft.
Writing an issue needs the content write permission. Sending needs the content publish permission. NOVA and your other agents can write issues but never send them: a person clicks Send.
Sources CREA watches (Beta)
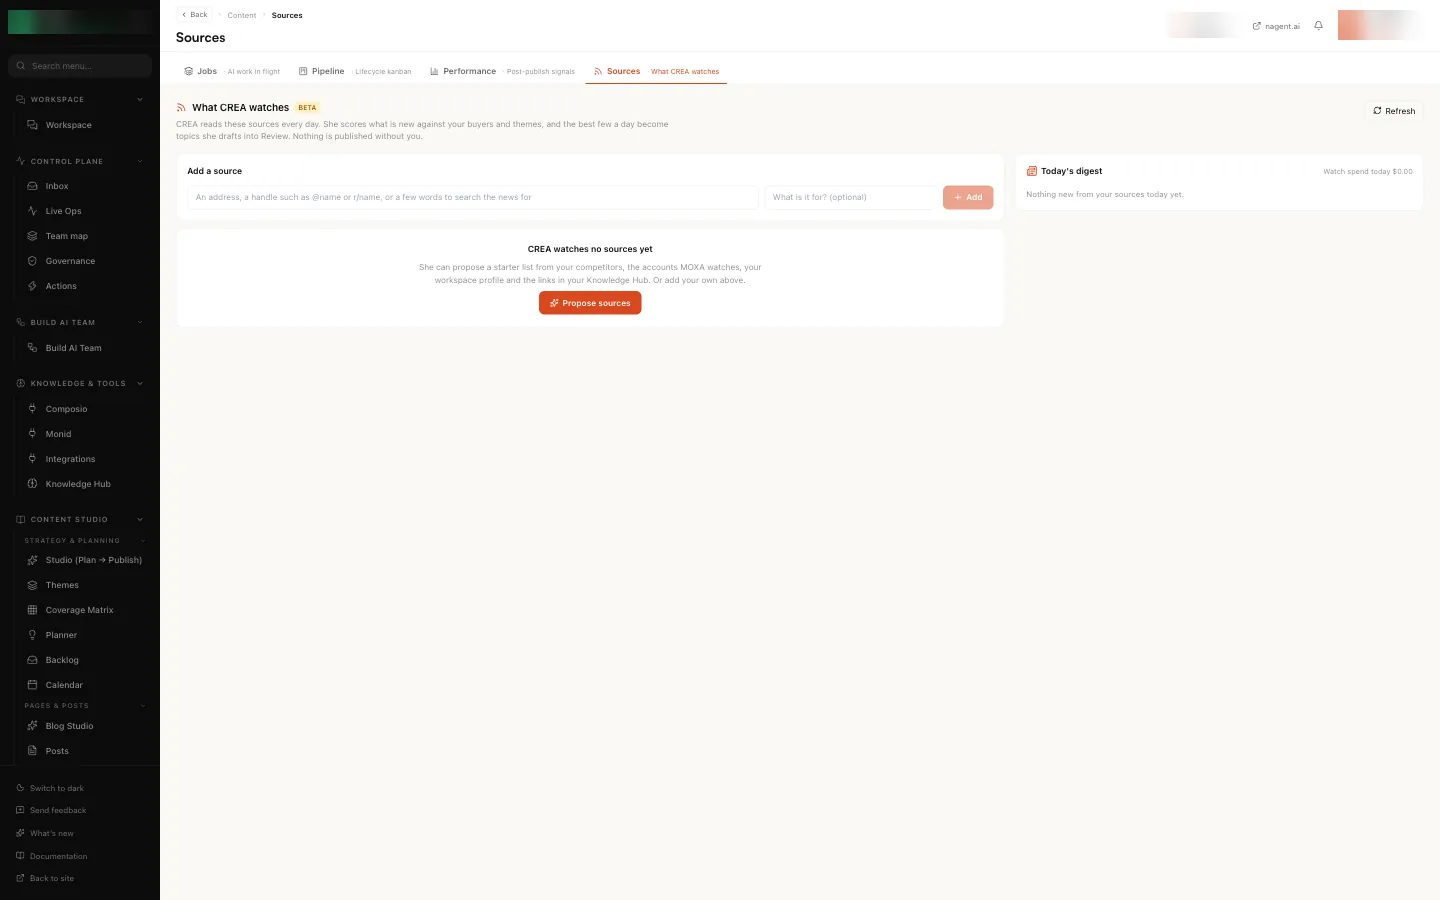
Sources, in the content screens, is the list of places CREA reads every day for things worth a post. She scores what is new against your buyers and themes, and the best few a day become topics she drafts into Review. Nothing is published without you.
Adding a source
Under Add a source, give one of these in Source to watch:
- a web address, for a site's feed or a page,
- a handle, such as
@namefor a LinkedIn person or company, an X account or a YouTube channel, orr/namefor a Reddit community, - an Instagram account, as
instagram.com/name(Beta), - or a few words to search the news for, with a Market for the news search (Any market unless you pick one).
What is it for? is optional and tells CREA why you are watching it. If the list is empty, Propose sources asks CREA for a starter list from your competitors and your themes; pause or remove any you do not want.
The first read of a new source only notes what is already there, so its items show from the next read on. Tick Keep the last 48 hours (Beta) when you add it, and the first read keeps anything from the last two days as well.
A web page that lists articles, such as a newsroom or a media releases page, reads as one item by default: CREA sees the page change, not each story. Tick This page lists articles. Read each new one (Beta) and each new article the page links to becomes its own item, read in full. The first read of a listing page only notes the articles already there, so Keep the last 48 hours does not show for it. You can switch an existing page with its Listing control; switching reads the page afresh, so nothing already on it counts as new.
What she does with what she finds
Each new item gets a score out of 100. An item that scores above 80 is Queued as a topic and drafted, up to five a day for the workspace unless you change the limit (see Source Watch settings); the rest past that are Held: over today's limit of picks. Each source can be opened to show its items, with their scores and what became of them.
To draft an item yourself, press Promote on it. It becomes a topic and CREA drafts it, about 100 credits from her budget. If her level does not let her draft on her own, the draft waits for your approval first. Nothing is published.
Today's digest at the top lists what was queued for a draft, what was held, what was skipped, leads waiting for a person, any article that was not sent to WordPress, and any source that could not be read, with Watch spend today. CREA also posts the digest in her room once a day.
Each source shows whether it is Active or Paused, with Pause or Resume, and Stop watching, which stops new reads and keeps what it already found until that expires. A source CREA proposed is marked Proposed by CREA. Adding and changing sources needs permission to write content.
Official sources and leads (Beta)
Each source is Official or a Lead, which you can change on its row.
- Official sources are the places a story comes from: a government site, a company's newsroom, a regulator's feed. Their items are scored and the best are queued for a draft, as above.
- Leads point at a story that happened somewhere else: a news search, a social account, another publisher. Their items are never queued on their own and never use up the day's limit. They wait in the digest under Leads waiting for a person to pick. Promote one and CREA drafts it with a brief to report from the primary source and credit it, not to rewrite the lead.
A source you add without choosing is Official, unless the workspace reads as a newsroom: then feeds and pages are Official and every other kind starts as a Lead.
Each row also has a Category (your own word, such as a beat or a desk), a Priority from P1 to P3, and how often it is read: Daily, 3 times a week or Weekly.
Source Watch settings (Beta)
Source Watch settings, on the Sources screen, holds the workspace's limits. Changing them needs permission to write content.
| Setting | What it does | Default |
|---|---|---|
| Drafts queued a day | Most topics CREA queues in a day, 1 to 30 | 5 |
| Sources read a tick | How many sources one hourly read takes, 1 to 20 | 5 |
| Framing | How CREA reads a story: Marketing, or Newsroom for a publisher, which scores a story as news for your readers and prefers primary sources over news sites | Marketing |
| Story scope | What you cover, in your own words, up to 2,000 characters. CREA scores stories outside it low and looks for new sources inside it | Empty |
| Find new sources every week | Weekly discovery, below | Off |
| New sources a week | Most discovery cards a week, 1 to 20 | 10 |
| Discovery budget | Credits one discovery run may use, 50 to 2,000 | 500 |
Raise Sources read a tick when you watch many sources, so each one is still read every day.
Write the Story scope the way you would brief a new reporter: the places, people and subjects that make a story yours, and what is not. CREA reads it with her guardrails each time she scores what her sources found. Skills you attach to CREA on her workbench are read there too, and when she drafts a watched item.
Finding new sources (Beta)
Find new sources, at the top of the Sources screen, asks CREA for places worth watching that you do not watch yet. She checks each one reads (a feed is preferred, the site allows it, and it has posted in the last 30 days), leaves out anything you already watch or turned down in the last 90 days, and files each good one as a Watch a source approval card. Nothing is watched until someone approves the card, whatever CREA's level. It needs at least one source on the list to start from.
Turn on Find new sources every week in the settings and she does the same every Monday, within New sources a week and Discovery budget. It is off until you turn it on.
Send approved articles to WordPress (Beta)
If your articles are published on your own WordPress site, Nagent can send each one there as a draft when you approve it. Your editors then publish it from WordPress as usual. Nagent never publishes a post in your WordPress.
What you need
- A WordPress site on HTTPS, version 5.6 or later.
- A WordPress user who can create posts: an Author, Editor or Administrator. A Contributor or Subscriber cannot.
- An application password for that user. It is not the user's login password, and you can revoke it in WordPress at any time.
- In Nagent, permission to change workspace settings, which a workspace admin holds.
If someone else runs your WordPress site, such as an agency, they create the application password in step 1. Enter it in step 2 together, on a call or at the same desk. Do not send it by email or chat.
1. Create an application password in WordPress
- Sign in to your WordPress admin as the user Nagent will post as.
- Open Users, then Profile, and scroll to Application Passwords.
- Type a name, such as
Nagent, and press Add New Application Password. - Copy the password it shows. WordPress shows it only once.
If Application Passwords is not on the profile page, the site is not on HTTPS, or a security plugin has turned them off.
2. Connect in Nagent
- Open Settings, Integrations and find the WordPress card (Beta).
- Enter the Site URL (for example
https://example.com), the WordPress Username and the Application password. - Press Connect. It shows Testing… while it checks that the user can create posts, then Connected.
The password is stored encrypted and never shown again. Connecting makes WordPress the place your approved articles go. Disconnect stops that: approved articles stop going to your WordPress site, and nothing already sent is removed.
3. Send a test article
- Approve one article with Approve & Publish.
- In WordPress, open Posts, then Drafts. The article is there with its title, body, excerpt and slug. Open in WordPress on the article in Nagent takes you straight to it.
- If the article shows Not sent to WordPress, the reason is on the article. Fix it and approve the article again; it does not make a second draft.
What happens when you approve an article
Press Approve & Publish (or Publish now) on an article and Nagent sends exactly the text you read to WordPress as a draft: the title, the body, the excerpt and the slug. Add the featured image and categories in WordPress before you publish. The article then shows Open in WordPress, which opens the draft in your WordPress editor.
- Approving it again updates the same WordPress draft. It never makes a second one.
- If you already published it in WordPress, Nagent leaves your post alone. The article says "Already published in WordPress; later edits stay in Nagent".
- If you deleted or trashed the draft in WordPress, approving again makes a new draft.
- Unpublishing the article in Nagent leaves WordPress alone.
If the send fails, the article is not published in Nagent either. It shows Not sent to WordPress with the reason, on the article, in its timeline and in Today's digest. Fix the cause and approve it again.
If Connect fails
| Message | Cause | Fix |
|---|---|---|
| "WordPress rejected the username or application password." | The username or password is mistyped, or the password was revoked. | Create a new application password under Users, Profile, and connect again. |
| "WordPress refused the request (403)." | A security plugin or firewall blocks the REST API, or application passwords are disabled. | Allow the REST API for signed-in users in the plugin (Wordfence, iThemes Security and "Disable REST API" plugins can block it), or ask your host. |
| "WordPress REST API not reachable at this address." | The address is wrong, or the REST API is blocked. | Check the site URL. Open https://<your site>/?rest_route=/ in a browser: it should show JSON. Nagent works with plain permalinks too. |
| "This WordPress user cannot create posts." | The user is a Contributor or Subscriber. | Use an Author, Editor or Administrator account. |
| "WordPress answered with an error (HTTP 500)." | The site itself failed, often because of a plugin or the host. The number varies. | Check the site's error log or ask your host, then connect again. |
The other content screens
| Screen | What it is for |
|---|---|
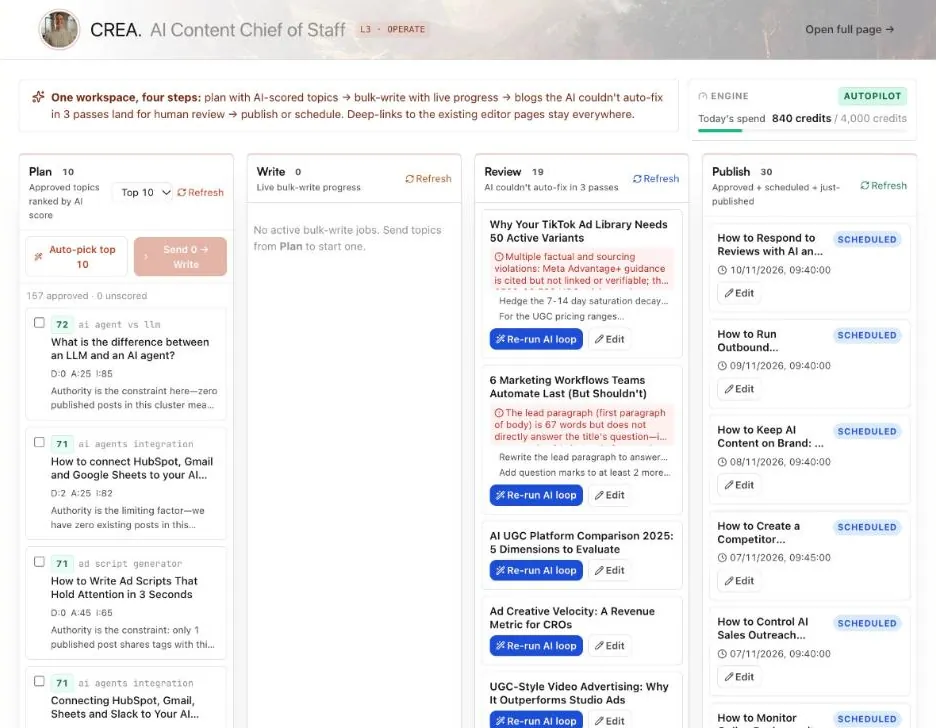
| Studio (Plan to Publish) | A board of topics and posts in four columns: Plan, Write, Review, Publish |
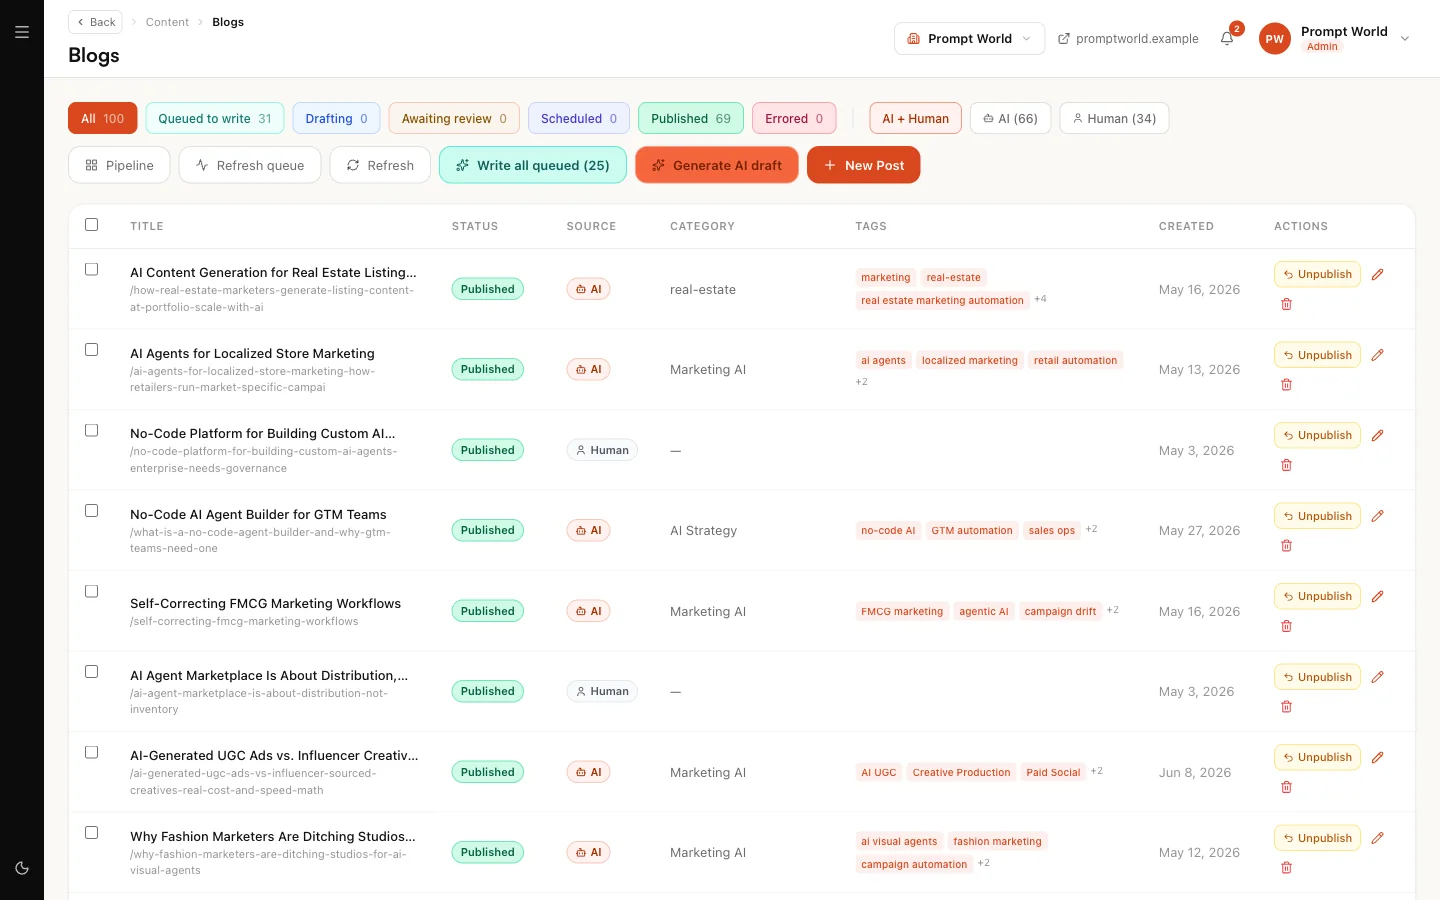
| Posts | Every post, AI and human, filtered by status. New Post writes one by hand |
| Sources | What CREA watches for topics, and today's digest (Beta). See sources CREA watches |
| Posts pipeline | Posts by stage, from queued to published |
| Image Studio | RUPA, for images. See RUPA |
| PAIGE | Decks and documents: presentations and PDF documents, with PowerPoint export. See Decks and landing pages |
| LANDON | Landing pages whose forms send leads to your CRM. See Decks and landing pages |
| NOVA | Newsletters (Beta): issues a person sends to your subscribers. See Write a newsletter with NOVA |
The Studio board's Review column holds drafts the team could not fix on its own in three passes, each with Re-run AI loop and Edit. Its Publish column holds approved, scheduled and just-published posts, each with Edit. The board also opens inside the Content room, on CREA's tab of the team surface.
Approving a topic in the Topic backlog first checks your live site's sitemap. If a page there already covers the topic, approval stops with "Your site already has a live page on this", the page's address, and "A second post would compete with it. Update that page instead, or approve anyway." The backlog then asks Approve it anyway? before it goes on.
Asking CREA directly
In your Content team's room, a message without an @ goes to the AI chief
of staff, CREA. Type @crea to address CREA by name. A brief like "Draft a
post on why prompt workshops fail without follow-up practice, for heads of
marketing" becomes a task on the team's board. See The team room.
The room's Team surface tab carries the team's own screens beside Board and Overview: CREA, RUPA, PAIGE, LANDON, NOVA, FOLIO and Alpha, each where your workspace has it. CREA shows the same Studio (Plan to Publish) board described above, so you can plan, review and publish without leaving the room. PAIGE, LANDON and NOVA open a card that links to each one's own page: PAIGE, LANDON and NOVA.
Ask for several pieces at once
When one ask needs work from more than one maker, CREA plans the pieces together. For example, in the Content room: "A launch kit for our stockout offer: a ten-slide pitch, a landing page and a short teaser video, for heads of supply chain."
- CREA writes one plan. Each piece names its maker: PAIGE for a presentation or document, LANDON for a landing page, NOVA for a newsletter issue, RUPA for an image and ALPHA for a video.
- The room shows one approval card for the plan. It lists every piece, its maker and an estimate, for example "3 pieces, about 54 credits, plus 1 quoted by its maker". A video is quoted when ALPHA plans its storyboard, so it shows as quoted by its maker rather than free.
- When you approve, each piece goes to its maker. Each still passes its maker's own approval and budget, so a piece can come back as its own card under Actions. Approving the plan does not approve the pieces.
- To change a plan, decline the card and tell CREA what to change. Nothing is made until you approve.
The person whose ask starts a plan needs content write, the same permission Image Studio needs. Nothing in a plan is published or sent.
The Landing page draft workflow in the Content room now goes to LANDON, who builds the page and leaves it unpublished for you to review. The fortnightly Newsletter issue workflow goes to NOVA, who writes the issue and leaves it unsent for you to review and send. The Product shoot workflow goes to RUPA, who plans the shot list and then renders each shot, every render waiting for its own approval.
Asking CREA from another room
You do not have to be in the Content room to get content made. In any other
team room, type @CREA and say what you need: an article, a post, a deck, a
document, a landing page, an email, an image or a video. Agents in that room
can ask in the same way when a brief calls for content they do not make
themselves.
To say who should make it, name the maker instead. The request still goes to CREA's team, with the maker written into the brief, for example "For RUPA: a banner for the spring sale":
| Type | For |
|---|---|
@RUPA | An image |
@PAIGE | A presentation or document |
@LANDON | A landing page |
@ALPHA | A video, or a product demo from a recording, screenshots or a URL |
For example, in the Sales room: "@PAIGE a ten-slide pitch for a mid-size
retailer on cutting stockouts, for their head of supply chain", or in the
Marketing room: "@RUPA a square banner for the Prompt World spring
workshop". Agents can name the maker the same way. If the maker already sits
on that room's own team, the message goes to it directly, as any @ does.
What happens next:
- The request becomes one task on the Content team's board. Its row says who asked and from where, for example "Requested by MIRA (Marketing)", and a note in the Content room links back to the thread that asked.
- The asking thread gets the reply "Asked CREA in the Content room. Progress shows below." and a Content request card that follows the task.
- CREA's team does the work in the Content room, under the same approvals as any of its runs.
- The outcome is posted back to the thread that asked: finished, waiting for an approval (with the names of who can give it), refused with the reason, or a question the team needs answered. A document the team files is copied into the asking room.
If your workspace has no Content team, the reply says so: "This workspace has no Content team yet, so there is nobody to make this. An admin can install the Content team from Teams; then ask again." It carries an Install the Content team link. Nothing else is created.
People can ask as often as they like. Requests from agents are capped at 100 a day per workspace, and the Content team says so when the cap is reached.
If you also run DRIS, it hands content gaps it finds, such as a keyword with no page, to the content team the same way, and those hand-overs count toward the same daily cap of 100.
What it costs
Blog Studio says it under the start button: "Estimated cost about 36 credits per blog. Run is daily-budget gated." The team's runs share a daily blog budget; when it is spent, a new run stops with "Daily blog budget exceeded" and you can start it again the next day. The Studio board shows Today's spend against the cap, and each run page shows what that run actually cost.
The cap is your workspace's own. Find it in Settings, under Blog engine mode, as Daily blog spend cap, typed in credits. Until someone sets it, it is "Sized to your plan and posting cadence, so a day's drafts and their reviews finish." Type a number of credits from 0 to 200,000 and click Save Settings to fix it yourself; the line then reads "Set by your team." Use the plan-sized cap puts the sized figure back. The same line shows what has been spent today.
A draft that comes out well short of its length gets up to two more passes to finish it, rather than failing.
Limits today
- Publish by hand. Scheduled publishing and the blog engine modes in Settings (Manual, Assisted, Autopilot) do not run for customer workspaces yet. Topics found on your watched sources do (see sources CREA watches), and their drafts still wait in Review. A post marked Scheduled may not go out on its own: use Approve & Publish or Publish now.
- View live shows the Nagent website, not yours.
- The For a marketplace agent mode is for Nagent's own content.
Where to go next
- The Knowledge Hub: the material every draft reads.
- RUPA, the image studio: the images in your posts.
- Decks and landing pages: PAIGE's decks and documents, and LANDON's landing pages.
- Alpha, the video studio: video.
- Connect your site: show posts on your website.